Raspberry Pi
Turning on raspberry pi with an Wi-Fi?
The Raspberry Pi has many great features straight out of the box, unfortunately WiFi is not one of them, in this guide I’ll show you how I WiFi equipped my Raspberry PI for only a fiver.
We will be assuming that you have a head less setup (without a monitor) so the guide should work for everyone, either via SSH (remote) or via a local terminal session if you do have a monitor.
Also its worth noting that some WiFi adapters will require a powered USB hub between the Raspberry PI and the USB module, the one used below doesn’t due to it’s power consumption assuming you don’t have anything else drawing large currents from the USB power.
1. What you will need…
- Raspberry Pi, with Wheezy
- Internet Connection (via the ethernet port to begin with)
- WiFi network to test on
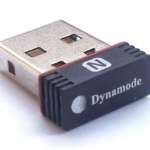
- USB WiFi Dongle, either of the below work:
- Amazon Link (USA Amazon)
- Amazon Link or Amazon Link (UK Amazon)
2. Update the OS
There are so many times you will run into a bug when installing something new and find out that it would have worked if your system was up to date, taking no risks here so get your system updated
1
2
| sudo apt-get updatesudo apt-get upgrade |
Due to the RAM/CPU power on the Pi’s, this might take a while, brew anyone?
3. Reboot
Power down the device, install your WiFi USB module and turn it back on.
4. Setup the interface configuration
1
| sudo nano /etc/network/interfaces |
Normally your base configuration will look something like this
1
2
3
4
5
6
7
8
9
| auto loiface lo inet loopbackiface eth0 inet dhcpallow-hotplug wlan0iface wlan0 inet manualwpa-roam /etc/wpa_supplicant/wpa_supplicant.confiface default inet dhcp |
Assuming you have a DHCP server on your LAN (normally your DSL/Cable router) use the following configuration, your SSID and password will be put in the wpa_supplicant.conf later on in this guide.
1
2
3
4
5
6
7
8
9
| auto loiface lo inet loopbackiface eth0 inet dhcpallow-hotplug wlan0auto wlan0iface wlan0 inet dhcpwpa-roam /etc/wpa_supplicant/wpa_supplicant.conf |
If you don’t have a DHCP server, or if you want to just statically assign the IP address you can use the following, however update the IP, Netmask and Gateway to match your network.
1
2
3
4
5
6
7
8
9
10
11
| auto loiface lo inet loopbackiface eth0 inet dhcpallow-hotplug wlan0iface wlan0 inet manualaddress 192.168.0.100netmask 255.255.255.0gateway 192.168.0.1wpa-roam /etc/wpa_supplicant/wpa_supplicant.conf |
5. Setup the WPA configuration
Finally you will want to edit the WPA configuration as below, don’t forget to update it for your SSID and WPA password!
1
| sudo nano /etc/wpa_supplicant/wpa_supplicant.conf |
1
2
3
4
5
6
7
8
| network={ssid="SSID-GOES-HERE"proto=RSNkey_mgmt=WPA-PSKpairwise=CCMP TKIPgroup=CCMP TKIPpsk="WIFI-PASSWORD-GOES-HERE"} |
6. Final Reboot
Ok that should be it, do a final reboot remove the wired ethernet cable and your IP should automatically come onto the network as a normal WiFi device.
Best Raspberry Pi Projects

It’s been a big first year for Raspberry Pi, the $35 mini Linux computer. As soon as they started shipping, makers were eager to get their hands on the board so that they could use it in their projects. In just a few months, we’ve seen a ton of great Raspberry Pi projects come our way. Below, we’re recounting some of our favorite projects in no particular order. We’re looking forward to seeing what you do with Raspberry Pi in 2013. Something tells me it’ll be a big year for the Pi.
Build a Combination Pandora Jukebox and Airplay Receiver

Build Your Own Raspberry Pi-Powered Computer

Tune in Tweets with Magpi Radio
“Magpi Radio uses text-to-speech to read tweets coming in from various channels. Volume and power are controlled by the knob on the left. Channels can be selected by turning the knob on the right. As you click through channels, the beak changes color so you have a “glanceable” indication of its state. Pressing the knob on the right will favorite the last tweet, indicated by a red pulsing beak.
Set Up a Personal Web Server


Use a Raspberry Pi to Automate Time-Lapse Photos
 Time-lapse videos of cityscapes or stars streaming across the sky can make forbeautiful video, but to get the same effect, you'll need a dolly that can move, pan, and tilt the shot ever-so-slowly over the course of many hours. Instead of spending a ton of money on a professional rig, Rick Adam'sDIY Raspberry Pi-powered dolly does the same for far far cheaper, and can be remotely controlled and managed by an Android phone. This one will take some work if you want to do it yourself, but the proof is in the results.
Raspberry Pi as an FM Transmitter
This was a project by the Imperial College Robotics Society in the UK. It’s code and instructions for using the Raspberry Pi as a low-power mono FM transmitter. When I saw how easy it looked to do, I ran over to my Pi, downloaded the code, and got it running within a matter of minutes (see video above).
This was a project by the Imperial College Robotics Society in the UK. It’s code and instructions for using the Raspberry Pi as a low-power mono FM transmitter. When I saw how easy it looked to do, I ran over to my Pi, downloaded the code, and got it running within a matter of minutes (see video above).

Enhancing a DSLR with Raspberry Pi
The hacked-together DSLR accessory attaches to the bottom of his camera and lets the maker shoot and transmit photos over WiFi, remote control the camera via tablet or phone, and shoot in a custom time lapse mode.
The hacked-together DSLR accessory attaches to the bottom of his camera and lets the maker shoot and transmit photos over WiFi, remote control the camera via tablet or phone, and shoot in a custom time lapse mode.

Light Painting with Raspberry Pi
Adafruit’s Phillip Burgess posted this fantastic tutorial to their Learning System on how to use Raspberry Pi to paint with light. In addition to the Pi, the project uses an RGB LED strip, a recumbent bike, and camera set to capture long exposures.
Adafruit’s Phillip Burgess posted this fantastic tutorial to their Learning System on how to use Raspberry Pi to paint with light. In addition to the Pi, the project uses an RGB LED strip, a recumbent bike, and camera set to capture long exposures.

Lego Raspberry Pi Enclosure
Biz, a 12 year-old member of the Boreatton Scout Troop’s Robo Team, created this excellent Raspberry Pi enclosure out of Lego bricks. The enclosure gives access to all the ports on the sides of the board and even sports a Lego-style Raspberry Pi logo on the top.
Biz, a 12 year-old member of the Boreatton Scout Troop’s Robo Team, created this excellent Raspberry Pi enclosure out of Lego bricks. The enclosure gives access to all the ports on the sides of the board and even sports a Lego-style Raspberry Pi logo on the top.

Source:lifehacker,blogmagzine.Thanks for your source.